1.对于非懒加载的单利bean,在spring容器启动时就已经创建。
// 创建一个Spring容器
		AnnotationConfigApplicationContext applicationContext = new AnnotationConfigApplicationContext(AppConfig.class);
		UserService userService = (UserService) applicationContext.getBean("userService");
		userService.test();
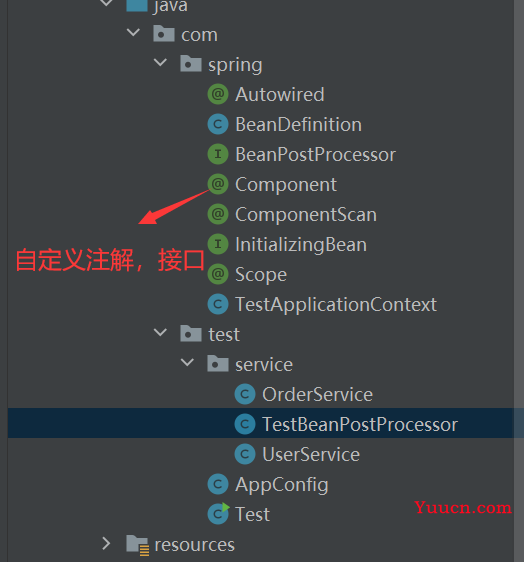
项目基本结构

1.创建@ComponentScan注解,定义包扫描路劲
//定义扫描路劲
@Retention(RetentionPolicy.RUNTIME)
@Target(ElementType.TYPE)
public @interface ComponentScan {
    String value() default "";
}
2.创建@Component注解,向spring容器注册bean
@Retention(RetentionPolicy.RUNTIME)
@Target(ElementType.TYPE)
public @interface Component {
    String value() default "";
}
3.创建AppConfig配置类,定义包扫描路径。
//配置类
@ComponentScan("com.test.service")
public class AppConfig {
}
4.创建OrderService和UserService类。
@Component("userService")
@Scope("prototype")
public class UserService {
    public void test(){
        System.out.println("useService");
    }
}
public class OrderService {
    public void test(){
        System.out.println("orderService");
    }
}
5.创建TestApplicationContext容器。
public class TestApplicationContext {
    private Class configClass;
    //存储BeanDefinition对象
    private Map<String,BeanDefinition> beanDefinitionMap=new HashMap<>();
    //单例池map,存储单例bean对象
    Map<String,Object> singletonObject=new HashMap<>();
    public TestApplicationContext(Class configClass) {
        this.configClass = configClass;
    }
    public Object getBean(String name){
        return null;
    }
}
6.从容器获取bean对象。
public class Test {
    public static void main(String[] args) {
        //创建conext容器,创建单例bean,Appconfig构造方法中完成
        TestApplicationContext applicationContext = new TestApplicationContext(AppConfig.class);
        UserService userService = (UserService) applicationContext.getBean("UserService");
    }
}
至此大体框架已经完成,接下来完成如何扫描,创建bean对象等等
- 在TestApplicationContext 的构造方法中扫描AppConfig定义的扫描路径,扫描定义的bean。
public TestApplicationContext(Class configClass) {
       this.configClass = configClass;
       //扫描
       scan(configClass);
   }
private void scan(Class configClass) {
       //判断当前类上是否有ComponentScan注解
       if (configClass.isAnnotationPresent(ComponentScan.class)){
           ComponentScan componentScanAnnotation = (ComponentScan) configClass.getAnnotation(ComponentScan.class);
           String path = componentScanAnnotation.value();
           path=path.replace(".","/"); // com/test/service
           //获取target包下的class文件取出,解析注解,通过Appclassloader类加载器获取
           ClassLoader classLoader = TestApplicationContext.class.getClassLoader();
           URL resource = classLoader.getResource(path);
           File file = new File(resource.getFile());
           //取出目录下的文件,遍历
           if (file.isDirectory()){
               for (File f : file.listFiles()) {
                   String absolutePath = f.getAbsolutePath();
                   //path(C:\Users\cchuang4\IdeaProjects\springDemo\target\classes\com\test\service\OrderService.class)转换成com.test.service
                   absolutePath=absolutePath.substring(absolutePath.indexOf("com"),absolutePath.indexOf(".class"));
                   absolutePath=absolutePath.replace("\\",".");
                   try {
                       //判断class文件是否有@Component注解
                       //将class文件加载进来成为class对象
                       Class<?> clazz = classLoader.loadClass(absolutePath);
                       if (clazz.isAnnotationPresent(Component.class)){
                           //获取beanname
                           Component componentAnnotation = clazz.getAnnotation(Component.class);
                           String beanName = componentAnnotation.value();
                           //创建BeanDefinition对象
                           BeanDefinition beanDefinition = new BeanDefinition();
                           beanDefinition.setType(clazz);
                           //Bean是否为单例或原型
                           if (clazz.isAnnotationPresent(Scope.class)){
                               Scope scopeAnnotation = clazz.getAnnotation(Scope.class);
                               String value = scopeAnnotation.value();
                               beanDefinition.setScope(value);
                           }else {
                               //单例
                               beanDefinition.setScope("singleton");
                           }
                           //将bean的相关元信息存入beandefinitionMap
                           beanDefinitionMap.put(beanName,beanDefinition);
                       }
                   } catch (ClassNotFoundException e) {
                       throw new RuntimeException(e);
                   }
               }
           }
       }
   }
- 在TestApplicationContext容器加载的时候,如何去获取bean的一些元信息等,需要定义对一个bean元信息的描述,比如bean的class,bean的作用域,bean的Order等信息,在Spring生成bean的时候需要依赖于BeanDefinfition。
创建BeanDefinfition
package com.spring;
public class BeanDefinition {
    //类型
    private Class type;
    //作用域
    private String scope;
    //是否懒加载
    private boolean isLazy;
    public Class getType() {
        return type;
    }
    public void setType(Class type) {
        this.type = type;
    }
    public String getScope() {
        return scope;
    }
    public void setScope(String scope) {
        this.scope = scope;
    }
    public boolean isLazy() {
        return isLazy;
    }
    public void setLazy(boolean lazy) {
        isLazy = lazy;
    }
}
- 单例bean的获取去遍历beanDefinitionMap,找出所有的单例bean,并存入单例池map中,在getBean()时呢能够快速的获取单例bean。TestApplicationContext的构造方法:
public TestApplicationContext(Class configClass) {
        this.configClass = configClass;
        //扫描
        scan(configClass);
        //遍历map
        for (Map.Entry<String, BeanDefinition> entry : beanDefinitionMap.entrySet()) {
            String beanName= entry.getKey();
            BeanDefinition beanDefinition = entry.getValue();
            if (beanDefinition.getScope().equals("singleton")){
                //获取单例bean
                Object bean = createBean(beanName, beanDefinition);
                //将单例bean存进单例池的map中,在getBean()时直接拿取
                singletonObject.put(beanName,bean);
            }
        }
    }
- 通过getBean()方法去获取bean,先通过beanDefinitionMap获取beanDefinition,再去判断是单例/原型bean,如果是单例bean,直接从单例池singletonObject中获取。
public Object getBean(String beanName){
        //判断是否有这个bean
        if (!beanDefinitionMap.containsKey(beanName)){
            throw new NullPointerException();
        }else {
            //获取beanDefinition对象
            BeanDefinition beanDefinition = beanDefinitionMap.get(beanName);
            //判断单例/原型bean
            if (beanDefinition.getScope().equals("singleton")){
                //从单例池中直接获取
                Object singletonBean = singletonObject.get(beanName);
                return singletonBean;
            }else {
                //原型
                Object prototypeBean = createBean(beanName, beanDefinition);
                return prototypeBean;
            }
        }
    }
createBean()方法,创建bean对象
Object createBean(String beanName,BeanDefinition beanDefinition){
        Class clazz = beanDefinition.getType();
        Object instance = null;
        try {
            instance = clazz.getConstructor().newInstance();
        } catch (InstantiationException e) {
            throw new RuntimeException(e);
        } catch (IllegalAccessException e) {
            throw new RuntimeException(e);
        } catch (InvocationTargetException e) {
            throw new RuntimeException(e);
        } catch (NoSuchMethodException e) {
            throw new RuntimeException(e);
        }
        return instance;
    }
至此已经支持单例bean和原型bean的获取。
!!!测试运行Test类
1.当userService的@Scope("singleton")时:

1.当userService的@Scope("prototype")时:

此时@Component注解上要指定beanName,否则会NPE,如何获取默认的bean的名字?
//设置默认beanName
   if (beanName.equals("")){
       beanName= Introspector.decapitalize(clazz.getSimpleName());
   }
@AutoWire依赖注入的实现
- 创建Autowired注解,并在Userservice里添加OrderService属性。
@Retention(RetentionPolicy.RUNTIME)
@Target(ElementType.FIELD)
public @interface Autowired {
    String value() default "";
}
UserService.class
@Component("userService")
@Scope("prototype")
public class UserService {
    @Autowired
    private OrderService orderService;
    public void test(){
        System.out.println(orderService);
    }
}
- 在创建bean时进行依赖注入,先根据type,再根据name去容器中找。createBean():
Object createBean(String beanName,BeanDefinition beanDefinition){
        Class clazz = beanDefinition.getType();
        Object instance = null;
        try {
            instance = clazz.getConstructor().newInstance();
            //依赖注入
            for (Field field : clazz.getDeclaredFields()) {
                if (field.isAnnotationPresent(Autowired.class)){
                    field.setAccessible(true);
                    //根据type去单例池或beanDefinitionMap中去找
                    //...省略
                    //根据beanName去找
                    field.set(instance,getBean(beanName));
                }
            }
        } catch (InstantiationException e) {
            throw new RuntimeException(e);
        } catch (IllegalAccessException e) {
            throw new RuntimeException(e);
        } catch (InvocationTargetException e) {
            throw new RuntimeException(e);
        } catch (NoSuchMethodException e) {
            throw new RuntimeException(e);
        }
        return instance;
    }
- 此时若先扫描到UserService,然后去创建UserService这个bean,然后在上面依赖注入的field.set(instance,getBean(beanName))时,此时OrderService单例池中还没有创建这个bean,依赖注入就会出问题。此时在创建bean时再去判断bean是否存在,不存在则再生成。
    public Object getBean(String beanName){
        //判断是否有这个bean
        if (!beanDefinitionMap.containsKey(beanName)){
            throw new NullPointerException();
        }else {
            //获取beanDefinition对象
            BeanDefinition beanDefinition = beanDefinitionMap.get(beanName);
            //判断单例/原型bean
            if (beanDefinition.getScope().equals("singleton")){
                //从单例池中直接获取
                Object singletonBean = singletonObject.get(beanName);
                //若此时对应的bean还没有创建,如在依赖注入时
                if (singletonBean==null){
                    singletonBean=createBean(beanName,beanDefinition);
                    singletonObject.put(beanName,singletonBean);
                }
                return singletonBean;
            }else {
                //原型
                Object prototypeBean = createBean(beanName, beanDefinition);
                return prototypeBean;
            }
        }
    }
测试,输出UserService里的OrderService对象:

此时依赖注入已经完成
初始化(InitializingBean接口)
- 创建InitializingBean接口
public interface InitializingBean{
    void afterPropertiesSet() throws Exception;
}
UserService.class
@Component("userService")
@Scope("prototype")
public class UserService implements InitializingBean {
    @Autowired
    private OrderService orderService;
    public void test(){
        System.out.println(orderService);
    }
    @Override
    public void afterPropertiesSet() throws Exception {
        System.out.println("afterPropertiesSet");
    }
}
此时在UserService加载时afterPropertiesSet不能自动调到。
- 在createBean()之后判断当前实例是否实现了InitializingBean 接口,实现了则调用afterPropertiesSet方法。
//调用实现了InitializingBean的afterPropertiesSet方法
if (instance instanceof InitializingBean){
                ((InitializingBean)instance).afterPropertiesSet();
            }
BeanPostProcessor的实现
-
该接口也叫后置处理器,作用是在Bean对象在实例化和依赖注入完毕后,在显示调用初始化方法的前后添加我们自己的逻辑。注意是Bean实例化完毕后及依赖注入完成后触发的。
-
创建BeanPostProcessor接口
public interface BeanPostProcessor {
    default Object postProcessBeforeInitialization(Object bean, String beanName){
        return bean;
    }
    default Object postProcessAfterInitialization(Object bean, String beanName){
        return bean;
    }
}
- 创建自己的类,去实现BeanPostProcessor接口,在类上加上@Component(自定义注解),以便被spring托管扫描到。在包扫描(scan()方法)时,会判断如果当前类上有@Component注解,然后会判断是否实现了BeanPostProcessor注解,
此时的bean的后置处理器会针对所有bean,若想针对其中一个bean,则需自己写处理逻辑。
@Component
public class TestBeanPostProcessor  implements BeanPostProcessor {
    @Override
    public Object postProcessAfterInitialization(Object bean, String beanName) {
        System.out.println(beanName);
        return BeanPostProcessor.super.postProcessAfterInitialization(bean, beanName);
    }
}
- 创建在扫描时扫描到的那些实现了BeanPostProcessor接口的对象的list集合。
    //存放BeanPostProcessor对象
    List<BeanPostProcessor> beanPostProcessorList=new ArrayList<>();
- 在scan时判断扫描到的那些bean是否实现了BeanPostProcessor接口,实现了则加入list集合中。
if (clazz.isAnnotationPresent(Component.class)){
                            //判断类是否实现了BeanPostProcessor接口
                            if (BeanPostProcessor.class.isAssignableFrom(clazz)){
                                //获得BeanPostProcessor的实例
                                BeanPostProcessor instance = (BeanPostProcessor) clazz.getConstructor().newInstance();
                                //将BeanPostProcessor对象存入list(LinkList)
                                beanPostProcessorList.add(instance);
                            }
                    ......
- 在createBean()时,在调用了实现InitializingBean的afterPropertiesSet()方法之后,再去调用BeanPostProcessor接口的方法。
            //调用初始化后方法
            for (BeanPostProcessor beanPostProcessor : beanPostProcessorList) {
                instance = beanPostProcessor.postProcessAfterInitialization(instance, beanName);
            }