这里给大家分享我在网上总结出来的一些知识,希望对大家有所帮助
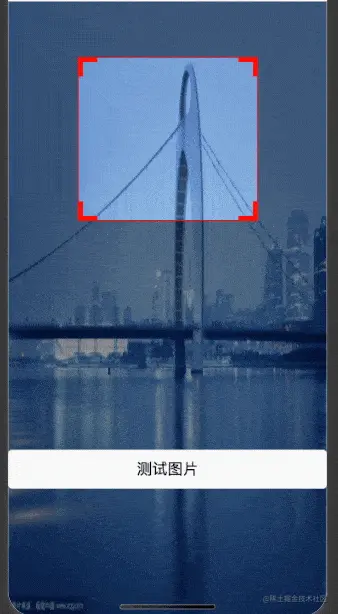
最近公司出了一个新的功能模块(如下图),大提上可以描述为实现拍照完上传图片,拖动四方框拍照完成上传功能,大体样子如下图。但是我找遍了 dcloud 插件市场,找到的插件都是移动背景图片来实现裁剪的,跟京东的功能是相反的,没办法只能自己来实现这么一个插件。
第一步
首先就需要实现一个四方框的功能了。从上图可知,四方框有一下几个特点
- 四个角粘连外框,随着框的大小和移动范围紧缚移动
- 四方框可随意四个方向拖动
- 方框外区域阴影不影响方框内
那么我们根据这个特性来实现下这个功能,对于 css 规范的话使用 bem 规范
<div class="clip__content">
<div v-for="(item, index) in 4" :key="index" class="clip__edge"></div>
</div>
/more
$edge-border-width: 6rpx;
.clip {
&__content {
position: fixed;
width: 400rpx;
height: 400rpx;
left: 0;
top: 0;
border: 1px solid red;
z-index: 4;
overflow: hidden;
box-shadow: rgba(0, 0, 0, 0.5) 0 0 0 200vh;
}
&__edge {
position: absolute;
width: 34rpx;
height: 34rpx;
border: 10rpx solid red;
pointer-events: auto;
z-index: 2;
&::before {
content: "";
position: absolute;
z-index: 2;
width: 40rpx;
height: 40rpx;
background-color: transparent;
}
&:nth-child(1) {
left: $edge-border-width;
top: $edge-border-width;
border-bottom-width: 0 !important;
border-right-width: 0 !important;
&:before {
top: -50%;
left: -50%;
}
}
&:nth-child(2) {
right: $edge-border-width;
top: $edge-border-width;
border-bottom-width: 0 !important;
border-left-width: 0 !important;
&:before {
top: -50%;
left: 50%;
}
}
&:nth-child(3) {
left: $edge-border-width;
bottom: $edge-border-width;
border-top-width: 0 !important;
border-right-width: 0 !important;
&:before {
bottom: -50%;
left: -50%;
}
}
&:nth-child(4) {
right: $edge-border-width;
bottom: $edge-border-width;
border-top-width: 0 !important;
border-left-width: 0 !important;
&:before {
bottom: -50%;
left: 50%;
}
}
}
根据上面的 html 和 css 出来的样式大概如下图 外部的阴影效果我们用:box-shadow: rgba(0, 0, 0, 0.5) 0 0 0 200vh 来达成
第二步
第二步的话就要实现移动功能了,这里是一个比较考验耐心的地方,因为涉及到多个方向的变化,需要不断地进行调试,在此之前需要先分析下四个角变化的特性,下面先看 4 个角的移动特性(以 H5 思维)
- 第一个角的移动会改变方框的 left,top,width,right4 个值
- 第二个角的移动会改变方框的 top,with,height3 个值
- 第三个角的移动会改变方框的 left, width,height3 个值
- 第四个角的移动会改变方框的 width,height2 个值
- 四个角的移动都不能小于 4 个角的宽高,四个角的移动都不能超过屏幕,相应的逻辑需要做一下限制
首先需要获取下屏幕宽度,区域高度(因为头部可能会有导航栏目占位,所以不拿屏幕高度),四方框初始宽高,
uni.getSystemInfo({
success: res => {
console.log(res)
this.systemInfo = res
}
})
uni
.createSelectorQuery()
.select('.clip__content')
.fields({ size: true }, data => {
this.width = data.width
this.height = data.height
})
.exec()
uni
.createSelectorQuery()
.select('.clip')
.fields({ size: true }, data => {
this.screenHeight = data.height
})
.exec()
后续的话就可以进行四个角拖拽了,这里用到了 touchStart 和 touchMove,动态地为方框绑定样式
<div
v-for="(item, index) in 4"
class="clip__edge"
@touchstart.stop.prevent="edgeTouchStart"
@touchmove.stop.prevent="e => edgeTouchMove(e, index)"
@touchend.stop.prevent="edgeTouchEnd"
></div>
接下来开始写逻辑
edgeTouchStart(e) {
// 记录坐标xy初始位置
this.clientX = e.changedTouches[0].clientX;
this.clientY = e.changedTouches[0].clientY;
},
edgeTouchMove(e, index) {
const currX = e.changedTouches[0].clientX;
const currY = e.changedTouches[0].clientY;
// 记录坐标差
const moveX = currX - this.clientX;
const moveY = currY - this.clientY;
// 更新坐标位置
this.clientX = currX;
this.clientY = currY;
const { width, height, left, top, screenHeight } = this;
const { screenWidth } = this.systemInfo;
// 初始化最大宽高
let maxWidth = 0,
maxHeight = 0,
maxTop = top + moveY < 0 ? 0 : top + moveY,
maxLeft = left + moveX < 0 ? 0 : left + moveX;
// 四个角的宽高限制
if (index % 2 === 0) {
maxWidth = width - moveX > screenWidth ? screenWidth : width - moveX;
} else {
maxWidth = width + moveX > screenWidth ? screenWidth : width + moveX;
}
if (index < 2) {
maxHeight =
height - moveY > screenHeight ? screenHeight : height - moveY;
} else {
maxHeight =
height + moveY > screenHeight ? screenHeight : height + moveY;
}
// 四个角的规则计算逻辑 四边方框暂定40 更详细的要用.createSelectorQuery()去拿
if (index === 0) {
if (width - moveX <= 40 || height - moveY <= 40) return;
console.log(maxLeft);
this.clipStyle = {
width: maxWidth,
height: maxHeight,
left: maxLeft,
top: maxTop,
};
this.width = maxWidth;
this.height = maxHeight;
this.top = maxTop;
this.left = maxLeft;
// 右上角
} else if (index === 1) {
if (width + moveX <= 40 || height - moveY <= 40) return;
this.clipStyle = {
width: maxWidth,
height: maxHeight,
left,
top: maxTop,
};
this.width = maxWidth;
this.height = maxHeight;
this.top = maxTop;
} else if (index === 2) {
if (width - moveX <= 40 || height + moveY <= 40) return;
this.clipStyle = {
width: maxWidth,
height: maxHeight,
left: maxLeft,
top,
};
this.width = maxWidth;
this.height = maxHeight;
this.left = maxLeft;
} else if (index === 3) {
if (width + moveX <= 40 || height + moveY <= 40) return;
this.clipStyle = {
width: maxWidth,
height: maxHeight,
left,
top,
};
this.width = maxWidth;
this.height = maxHeight;
}
}
效果如下图
第三步
四个角拖拽逻辑完善之后,下一步目标就是做四方框的拖拽,这边需要对四方框的拖拽做一次限制
<div
class="clip__content"
:style="style"
@touchstart.stop.prevent="clipTouchStart"
@touchmove.stop.prevent="clipTouchMove"
>
...
</div>
clipTouchStart(e) {
this.touchX = e.changedTouches[0].pageX;
this.touchY = e.changedTouches[0].pageY;
},
clipTouchMove(e) {
const { screenWidth } = this.systemInfo;
const currX = e.changedTouches[0].pageX;
const currY = e.changedTouches[0].pageY;
const moveX = currX - this.touchX;
const moveY = currY - this.touchY;
this.touchX = currX;
this.touchY = currY;
// 边框限制逻辑
if (this.left + moveX < 0) {
this.left = 0;
} else if (this.left + moveX > screenWidth - this.width) {
this.left = screenWidth - this.width;
} else {
this.left = this.left + moveX;
}
if (this.top + moveY < 0) {
this.top = 0;
} else if (this.top + moveY > this.screenHeight - this.height) {
this.top = this.screenHeight - this.height;
} else {
this.top = this.top + moveY;
}
this.clipStyle = {
...this.clipStyle,
left: this.left,
top: this.top,
};
},
效果如下图:
第四步就是做我们的截图了,这里用到了 canvas
<div class="clip__content">
...
<canvas class="clip-canvas" canvas-id="clip-canvas"></canvas>
</div>
逻辑的话目前这个例子是使用了网络的 url 图片 所以要进行 download,如果是不用网络图片,那么这一句可以删除换成其他的获取图片 api
initCanvas() {
uni.showLoading({
title: "加载中...",
});
uni
.createSelectorQuery()
.select(".clip__content")
.fields(
{
size: true,
scrollOffset: true,
rect: true,
context: true,
computedStyle: ["transform", "translateX"],
scrollOffset: true,
},
(data) => {
uni.downloadFile({
url: this.imageUrl,
success: (res) => {
this.canvasInstance = uni.createCanvasContext(
"clip-canvas",
this
);
this.canvasInstance.drawImage(
res.tempFilePath,
-data.left,
-data.top,
this.systemInfo.screenWidth,
this.screenHeight,
0,
);
this.canvasInstance.draw(
false,
(() => {
setTimeout(() => {
uni.canvasToTempFilePath(
{
x: 0,
y: 0,
width: data.width,
height: data.height,
dWidth: data.width,
dHeight: data.height,
fileType: "jpg",
canvasId: "clip-canvas",
success: (data) => {
uni.hideLoading();
this.url = data.tempFilePath;
// this.canvasInstance.save();
},
},
this
);
}, 500);
})()
);
},
});
}
)
.exec();
},
效果如图所示:

如果对您有所帮助,欢迎您点个关注,我会定时更新技术文档,大家一起讨论学习,一起进步。