👏作者简介:大家好,我是小童,Java开发工程师,CSDN博客博主,Java领域新星创作者
📕系列专栏:前端、Java、Java中间件大全、微信小程序、微信支付、若依框架、Spring全家桶
📧如果文章知识点有错误的地方,请指正!和大家一起学习,一起进步👀
🔥如果感觉博主的文章还不错的话,请👍三连支持👍一下博主哦
🍂博主正在努力完成2023计划中:以梦为马,扬帆起航,2023追梦人
目录
Transition效果
Transition CSS 过渡
Transition 使用animation
TransitionGroup
KeepAlive
Teleport
Transition效果

Vue 提供了内置组件,可以帮助你制作基于状态变化的过渡和动画< Transition > 会在一个元素或组件进入和离开 DOM 时应用动画< Transition > 是一个内置组件,这意味着它在任意别的组件中都可以被使用,无需注册

过渡效果
<template>
    <button @click="show = !show">Toggle</button>
    <Transition>
        <p v-if="show">hello</p>
    </Transition>
</template>
<script setup>
  import { ref } from "vue"
  const show = ref(true)
</script>
<style scoped>
.v-enter-active, .v-leave-active {
    transition: opacity 0.5s ease;
}
.v-enter-from, .v-leave-to {
    opacity: 0;
}
.v-enter-to, .v-leave-from{
    opacity: 1;
}
</style>
Transition CSS 过渡
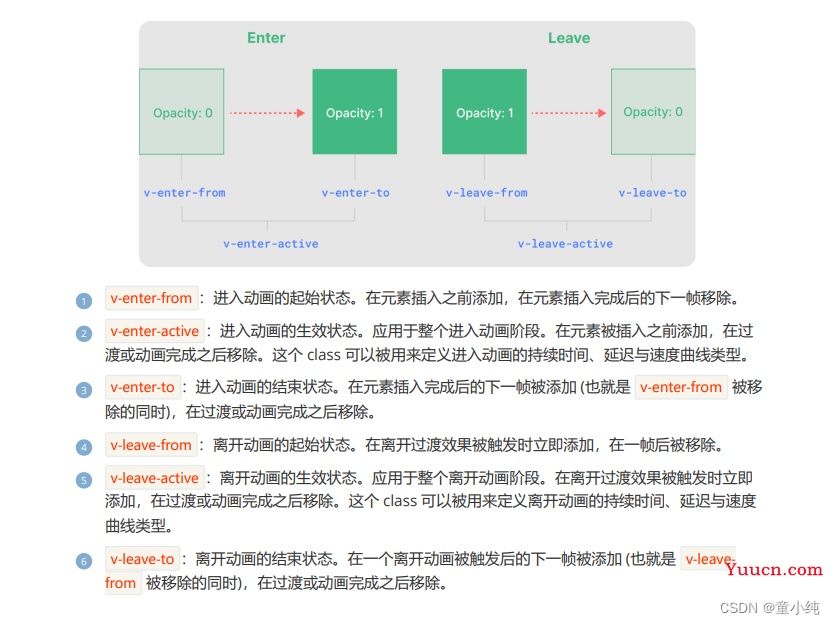
一共有 6 个应用于进入与离开过渡效果的 CSS class

<template>
    <button @click="changeHandler">变化</button>
    <Transition>
        <div v-if="show" class="box"></div>
    </Transition>
</template>
<script setup>
  import { ref } from "vue"
  const show = ref(true)
  function changeHandler(){
      show.value = !show.value
   }
</script>
<style scoped>
.box{
    width: 200px;
    height: 200px;
    background-color: red;
}
.v-enter-from{
    opacity: 0;
}
.v-enter-active {
    transition: opacity 2s ease;
}
.v-enter-to {
    opacity: 1;
}
.v-leave-from{
    opacity: 1;
}
.v-leave-active{
    transition: opacity 2s ease;
}
.v-leave-to{
    opacity: 0;
}
</style>
为过渡效果命名
<template>
    <button @click="changeHandler">变化</button>
    <Transition name="box">
        <div v-if="show" class="box"></div>
    </Transition>
</template>
<script setup>
import { ref } from "vue"
const show = ref(true)
function changeHandler(){
    show.value = !show.value
}
</script>
<style scoped>
  .box{
      width: 200px;
      height: 200px;
      background-color: red;
  }
 .box-enter-from{
    opacity: 0;
 }
 .box-enter-active {
    transition: opacity 2s ease;
 }
 .box-enter-to {
    opacity: 1;
 }
 .box-leave-from{
    opacity: 1;
 }
 .box-leave-active{
    transition: opacity 2s ease;
 }
 .box-leave-to{
     opacity: 0;
 }
</style>
实时效果反馈
1. 在Vue添加动画时,下列那个是 enter 过程动画的结束状态:
A v-enter-from
B v-enter-active
C v-enter-to
D v-leave-to
Transition 使用animation

使用 animation 实现动画效果
<template>
    <button @click="changeHandler">变化</button>
    <Transition name="box">
        <div v-if="show" class="box"></div>
    </Transition>
</template>
<script setup>
  import { ref } from "vue"
  const show = ref(true)
  function changeHandler() {
      show.value = !show.value
   }
</script>
<style scoped>
 .box{
    width: 200px;
    height: 200px;
    background-color: red;
}
.box-enter-active {
  animation: bounce-in 0.5s;
}
.box-leave-active {
  animation: bounce-in 0.5s reverse;
}
@keyframes bounce-in {
  0% {
    transform: scale(0);
 }
  50% {
    transform: scale(1.25);
 }
  100% {
    transform: scale(1);
 }
}
</style>
TransitionGroup

< TransitionGroup > 是一个内置组件,用于对 v-for 列表中的元素或组件的 插入、移除和顺序改变添加动画效果
<template>
    <button @click="addHandler">增加</button>
    <TransitionGroup name="list" tag="ul">
        <li v-for="item in items" :key="item">
            {{ item }}
        </li>
    </TransitionGroup>
</template>
<script setup>
  import { reactive } from "vue"
  const items = reactive(["iwen","ime","frank"])
  function addHandler() {
      items.push("sakura")
   }
</script>
<style scoped>
  .list-enter-active, .list-leave-active {
      transition: all 0.5s ease;
   }
  .list-enter-from, .list-leave-to {
      opacity: 0;
      transform: translateX(30px);
  }
  .list-enter-to, .list-leave-from {
      opacity: 1;
  }
</style>
KeepAlive
在切换时创建新的组件实例通常是有意义的,但在这个例子中,我们的确想要组件能在被“切走”的时候保留它们的状态。要解决这个问题,我们可以用 < KeepAlive > 内置组件将这些动态组件包装起来
保存状态
<template>
    <button @click="changeHandler">切换</button>
    <keep-alive>
        <component :is="activeComponent"></component>
    </keep-alive>
</template>
<script>
   import { ref } from "vue"
   import ComponentA from "./ComponentA.vue"
   import ComponentB from "./ComponentB.vue"
   export default {
      components:{
          ComponentA,
          ComponentB
   },
    setup() {
        const activeComponent = ref("ComponentA")
        function changeHandler() {
            activeComponent.value = activeComponent.value === "ComponentA" ? "ComponentB" : "ComponentA"
       }
        return {
            activeComponent,
            changeHandler
       }
   }
}
</script>
<template>
<h3>ComponentA</h3>
<button @click="addCount">countA:{{ count }}</button>
</template>
<script setup>
import { ref } from "vue"
const count = ref(0)
function addCount(){
count.value++
}
</script><template>
<h3>ComponentB</h3>
<button @click="addCount">countA:{{ count }}</button>
</template>
<script setup>
import { ref } from "vue"
const count = ref(0)
function addCount() {
count.value++
}
</script>包含/排除
< KeepAlive > 默认会缓存内部的所有组件实例,但我们可以通过 include 和 exclude prop 来定制该行为
<template>
    <button @click="changeHandler">切换</button>
    <keep-alive include="ComponentB">
        <component :is="activeComponent"></component>
    </keep-alive>
</template>
缓存实例的生命周期
<template>
    <h3>ComponentB</h3>
    <button @click="addCount">countA:{{ count }}</button>
</template>
<script setup>
  import { ref,onActivated, onDeactivated }  from "vue"
  const count = ref(0)
  function addCount() {
      count.value++
  }
  onActivated(() => {
    // 调用时机为首次挂载
    // 以及每次从缓存中被重新插入时
       console.log("加入");
   })
  onDeactivated(() => {
     // 在从 DOM 上移除、进入缓存
     // 以及组件卸载时调用
    console.log("移除");
  })
</script>
实时效果反馈
1. 在Vue组件中,下列那个是缓存生命周期函数:
A created
B mounted
C updated
D activated
Teleport
< Teleport >是一个内置组件,它可以将一个组件内部的一部分模板“传 送”到该组件的 DOM 结构外层的位置去
有时我们可能会遇到这样的场景:一个组件模板的一部分在逻辑上 从属于该组件,但从整个应用视图的角度来看,它在 DOM 中应该 被渲染在整个 Vue 应用外部的其他地方
< Teleport >提供了一个更简单的方式来解决此类问题,让我们不需要 再顾虑 DOM 结构的问题
<template>
    <button @click="open = true">Open Modal</button>
    <Teleport to="body">
        <div v-if="open" class="modal">
            <p>Hello from the modal!</p>
            <button @click="open = false">Close</button>
        </div>
    </Teleport>
</template>
<script setup>
  import { ref } from 'vue'
  const open = ref(false)
</script>
<style scoped>
  .modal {
     position: fixed;
     z-index: 999;
     top: 20%;
     left: 50%;
     width: 300px;
     margin-left: -150px;
     background: #999;
     padding: 20px;
     text-align: center;
}
</style>