个人简介
👀个人主页: 前端杂货铺
🙋♂️学习方向: 主攻前端方向,也会涉及到服务端
📃个人状态: 在校大学生一枚,已拿 offer(秋招)
🥇推荐学习:🍍前端面试宝典 🍉Vue2 🍋Vue3 🍓Vue2&Vue3项目实战 🥝Node.js
🌕个人推广:每篇文章最下方都有加入方式,旨在交流学习&资源分享,快加入进来吧
Node.js系列文章目录
| 内容 | 参考链接 |
|---|---|
| Node.js(一) | 初识 Node.js |
| Node.js(二) | Node.js——开发博客项目之接口 |
文章目录
- Node.js系列文章目录
-
- 一、前言
- 二、博客项目实现
-
- 1、文件目录
- 2、环境配置
- 3、开发接口
- 4、开发过程
- 三、各个接口的测试
- 四、写在最后(附源码)
一、前言
2022-10-24,首先祝大家节日快乐,工作和学习中再无 bug~~
本文 开发博客项目的接口,是使用的 假数据 处理的。
后续 的文章还会使用 各种框架和数据库进行重构,敬请期待~
该项目的 开发模式,是 常规通用 的方式,所以学习这种 层次渐进的开发模式 也是很有意义的!
二、博客项目实现
1、文件目录
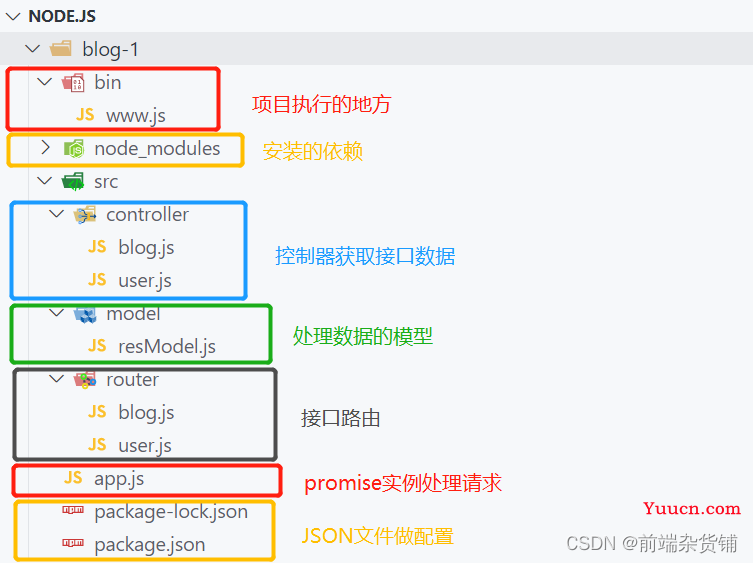
项目开发的层次感:
www.js(第一层)——> app.js(第二层)——> ./router(第三层)——> ./controller(第四层)
第一层:项目执行的地方
第二层:一些配置,请求响应头,格式化,promise实例等
第三层:路由接口,只关心路由,不管深层次的逻辑
第四层:只关心数据的地方
2、环境配置
初始化 package.json(配置相关文件)
npm init -y
安装依赖(安装相关依赖文件)
npm install
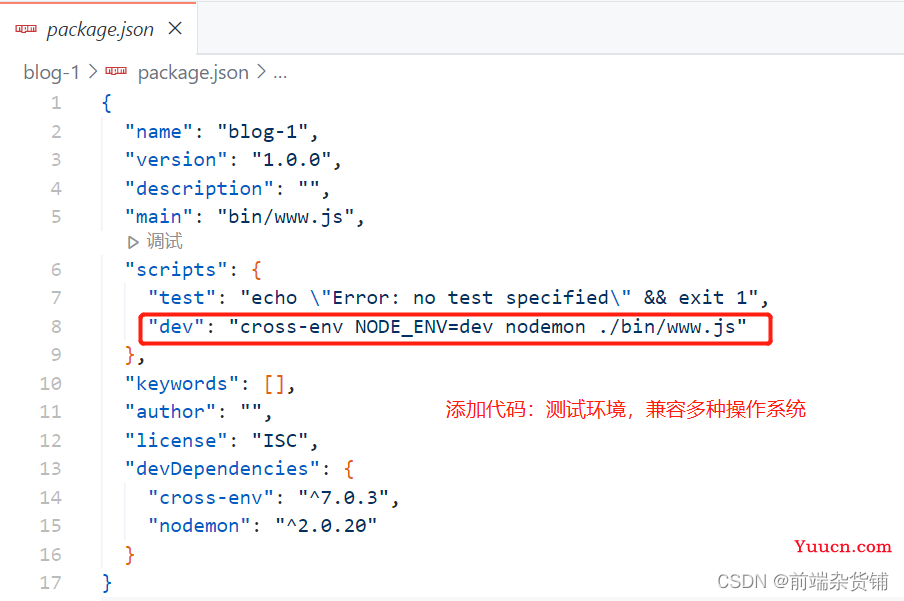
安装 nodemon(自动重启服务)
npm install nodemon cross-env --save-dev
3、开发接口
博客相关接口 && 用户相关接口

4、开发过程
./bin/www.js 文件
- 项目执行的文件
- 引入 http 模块
- 创建服务,传入文件(易开发和维护)
- 监听端口
// 引入 http 内置模块
const http = require('http')
// 端口
const PORT = 8000
// 引入 app.js
const serverHandle = require('../app')
// 创建服务
const server = http.createServer(serverHandle)
// 监听端口
server.listen(PORT)
…/src/app.js 文件
- 参数处理
- 响应头
- 格式化
- 处理博客和用户的相关路由
// 便于处理 url
const querystring = require('node:querystring')
// 博客相关路由
const handleBlogRouter = require('./src/router/blog')
// 用户登录相关路由
const handleUserRouter = require('./src/router/user')
// 用于处理 POST 请求的数据
const getPostData = (req) => {
    // 创建 promise 实例
    const promise = new Promise((resolve, reject) => {
        // 不是 post 请求 直接返回
        if (req.method !== 'POST') {
            resolve({})
            return
        }
        // 请求头不是 application/json 格式 直接返回
        if (req.headers['content-type'] !== 'application/json') {
            resolve({})
            return
        }
        // 初始化 postData
        let postData = ''
        // 每次发送的数据 记录在 postData 中
        req.on('data', chunk => {
            postData += chunk.toString()
        })
        // 数据发送完成 转义 JSON 为对象
        req.on('end', () => {
            if (!postData) {
                resolve({})
                return
            }
            resolve(
                JSON.parse(postData)
            )
        })
    })
    // 返回实例对象
    return promise
}
// 处理服务
const serverHandle = (req, res) => {
    // 设置响应头的格式 JSON
    res.setHeader('Content-type', 'application/json')
    // 获取请求地址 path
    const url = req.url
    // 截取前半部分的地址 ? 前面的部分
    req.path = url.split('?')[0] // 获取 ? 的前半部分
    // 截取后半部分的地址 ? 后面的部分 也是要查询的地址
    req.query = querystring.parse(url.split('?')[1])
    // 处理 post data
    getPostData(req).then(postData => {
        // 解析 POST 请求中的数据
        req.body = postData
        // 处理 blog 路由
        const blogData = handleBlogRouter(req, res)
        // 请求成功 格式化 blogData 并结束
        if (blogData) {
            res.end(
                JSON.stringify(blogData)
            )
            return
        }
        // 处理 user 路由
        const userData = handleUserRouter(req, res)
        // 请求成功 格式化 userData 并结束
        if (userData) {
            res.end(
                JSON.stringify(userData)
            )
            return
        }
        // 未命中路由,返回 404
        res.writeHead(404, {
            "Content-type": "text/plain"
        })
        // 在浏览器显示的内容
        res.write("404 Not Found\n")
        // 结束服务端和客户端的连接
        res.end()
    })
}
// 模块化 把 serverHandle 暴露出去
module.exports = serverHandle
…/src/model/resModel.js 文件
- 基础模型(对象类型和字符串类型)
- 成功的模型(继承)
- 失败的模型(继承)
// 基础模型
class BaseModel {
    // data 是对象类型 message 是字符串类型
    constructor(data, message) {
        if (typeof data === 'string') {
            this.message = data
            data = null
            message = null
        }
        if (data) {
            this.data = data
        }
        if (message) {
            this.message = message
        }
    }
}
// 成功模型 errno 赋值 0
class SuccessModel extends BaseModel {
    constructor(data, message) {
        // 继承父类
        super(data, message)
        // 成功的值 0
        this.errno = 0
    }
}
// 失败模型 errno 赋值 -1
class ErrorModel extends BaseModel {
    constructor(data, message) {
        // 继承父类
        super(data, message)
        // 失败的值 -1
        this.errno = -1
    }
}
// 导出共享
module.exports = {
    SuccessModel,
    ErrorModel
}
…/src/router/blog.js 文件
- 博客相关路由接口
- 调用相关函数
- 返回实例
// 导入博客和用户控制器相关内容
const { getList, getDetail, newBlog, updateBlog, delBlog } = require('../controller/blog')
// 导入成功和失败的模型
const { SuccessModel, ErrorModel } = require('../model/resModel')
// blog 路由
const handleBlogRouter = (req, res) => {
    const method = req.method // GET/POST
    const id = req.query.id // 获取 id
    // 获取博客列表 GET 请求·
    if (method === 'GET' && req.path === '/api/blog/list') {
        // 博客的作者 req.query 用在 GET 请求中
        const author = req.query.author || ''
        // 博客的关键字
        const keyword = req.query.keyword || ''
        // 执行函数 获取博客列表数据
        const listData = getList(author, keyword)
        // 创建并返回成功模型的实例对象
        return new SuccessModel(listData)
    }
    // 获取博客详情 GET 请求
    if (method === 'GET' && req.path === '/api/blog/detail') {
        // 获取博客详情数据
        const data = getDetail(id)
        // 创建并返回成功模型的实例对象
        return new SuccessModel(data)
    }
    // 新建一篇博客 POST 请求
    if (method === 'POST' && req.path === '/api/blog/new') {
        // req.body 用于获取请求中的数据(用在 POST 请求中)
        const data = newBlog(req.body)
        // 创建并返回成功模型的实例对象
        return new SuccessModel(data)
    }
    // 更新一篇博客
    if (method === 'POST' && req.path === '/api/blog/update') {
        // 传递两个参数 id 和 req.body
        const result = updateBlog(id, req.body)
        if (result) {
            return new SuccessModel()
        } else {
            return new ErrorModel('更新博客失败')
        }
    }
    // 删除一篇博客
    if (method === 'POST' && req.path === '/api/blog/delete') {
        const result = delBlog(id)
        if (result) {
            return new SuccessModel()
        } else {
            return new ErrorModel('删除博客失败')
        }
    }
}
// 导出
module.exports = handleBlogRouter
…/src/router/user.js 文件
- 博客相关路由接口
- 调用相关函数
- 返回实例
// 导入用户登录内容
const { loginCheck } = require('../controller/user')
// 导入成功和失败的模板
const { SuccessModel, ErrorModel } = require('../model/resModel')
// user 路由
const handleUserRouter = (req, res) => {
    const method = req.method
    // 登录
    if (method === 'POST' && req.path === '/api/user/login') {
        const { username, password } = req.body
        // 传入两个参数 用户名 密码
        const result = loginCheck(username, password)
        if (result) {
            return new SuccessModel()
        }
        return new ErrorModel('登录失败')
    }
}
// 导出共享
module.exports = handleUserRouter
…/src/controller/blog.js 文件
- 博客的相关数据处理
- 返回的是假数据(后续会使用数据库)
// 获取博客列表(通过作者和关键字)
const getList = (author, keyword) => {
    // 先返回假数据(格式是正确的)
    return [{
            id: 1,
            title: '标题1',
            content: '内容1',
            createTime: 1665832332896,
            author: 'zahuopu'
        },
        {
            id: 1,
            title: '标题2',
            content: '内容2',
            createTime: 1665832418727,
            author: 'xiaoming'
        },
    ]
}
// 获取博客详情(通过 id)
const getDetail = (id) => {
    // 先返回假数据
    return {
        id: 1,
        title: '标题1',
        content: '内容1',
        createTime: 1665832332896,
        author: 'zahuopu'
    }
}
// 新建博客 newBlog 若没有,就给它一个空对象
const newBlog = (blogData = {}) => {
    // blogData 是一个博客对象 包含 title content 属性
    console.log('newBlog', blogData)
    return {
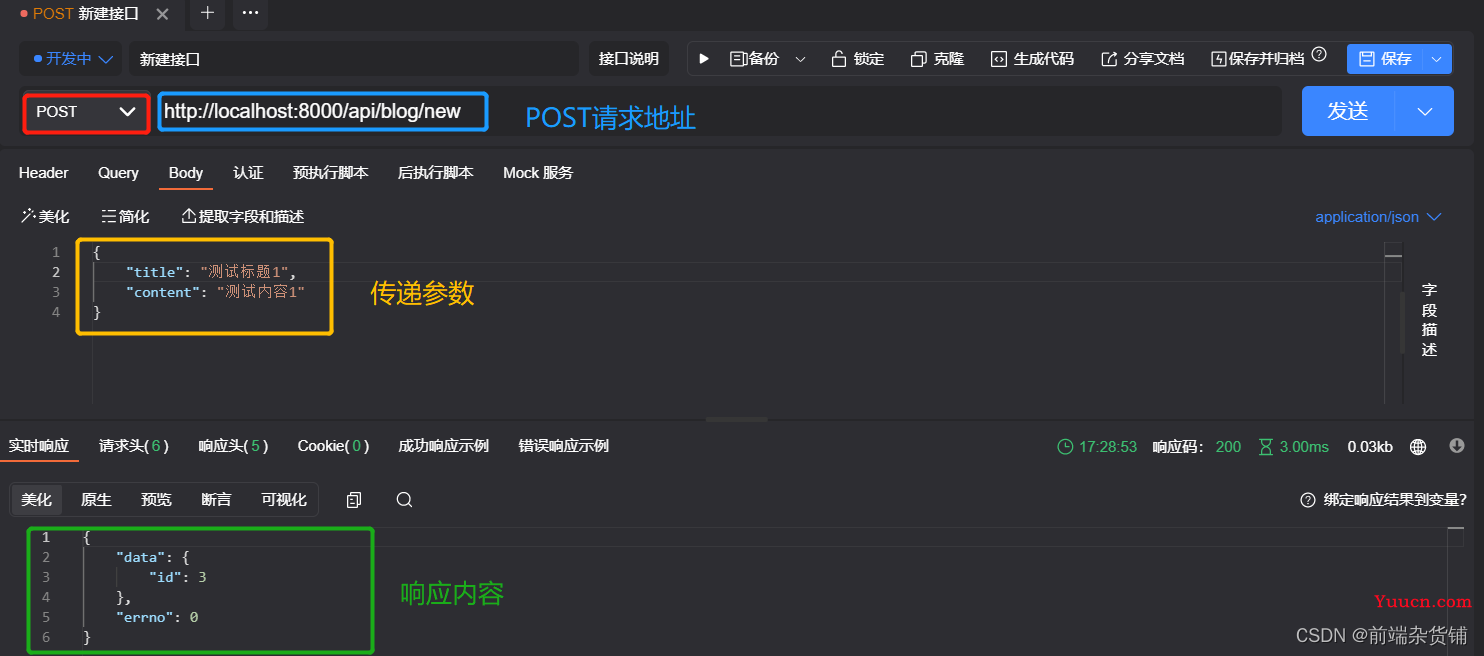
        id: 3 // 表示新建博客,插入到数据表里的 id
    }
}
// 更新博客(通过 id 更新)
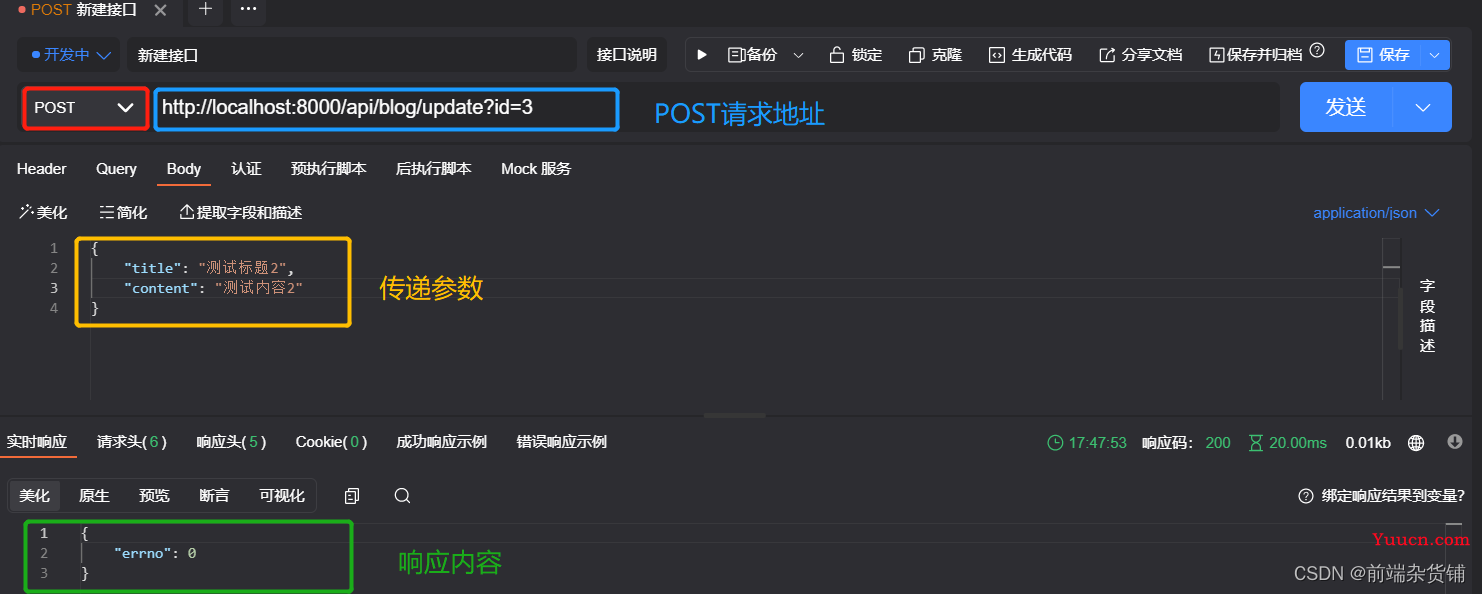
const updateBlog = (id, blogData = {}) => {
    // id 就是要更新博客的 id
    // blogData 是一个博客对象 包含 title content 属性
    console.log('update blog', id, blogData)
    return true
}
// 删除博客(通过 id 删除)
const delBlog = (id) => {
    return true
}
// 导出共享
module.exports = {
    getList,
    getDetail,
    newBlog,
    updateBlog,
    delBlog
}
…/src/controller/user.js 文件
- 用户登录的相关数据处理
- 返回的是假数据(后续会使用数据库)
// 登录(通过用户名和密码)
const loginCheck = (username, password) => {
    // 先使用假数据
    if (username === 'zahuopu' && password === '123') {
        return true
    }
    return false
}
// 导出共享
module.exports = {
    loginCheck
}
三、各个接口的测试
现在我们 已经完成 博客项目的开发了,接下来进入到 测试环节~~
通过关键字和作者 查询博客(GET 请求)

通过 id 获取 博客详情(GET 请求)

通过 ApiPost/Postman 工具测试 新增博客(POST 请求)
通过 ApiPost/Postman 工具测试 更新博客(POST 请求)

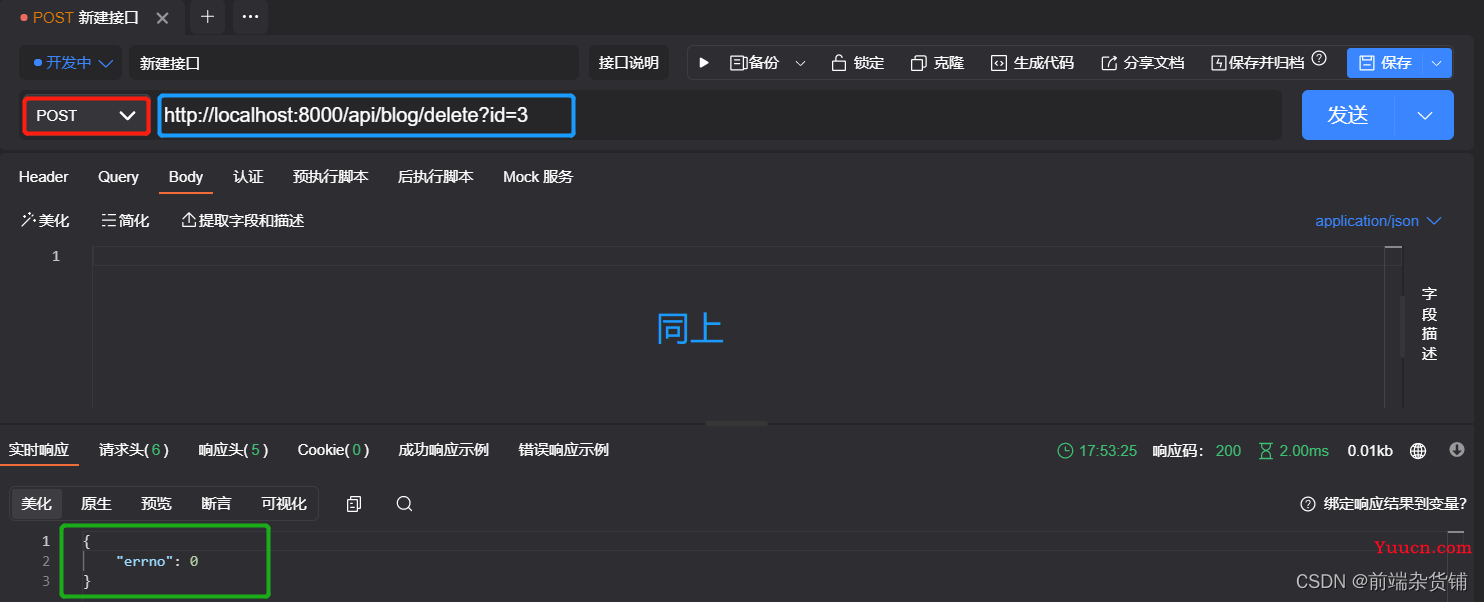
通过 ApiPost/Postman 工具测试 删除博客(POST 请求)
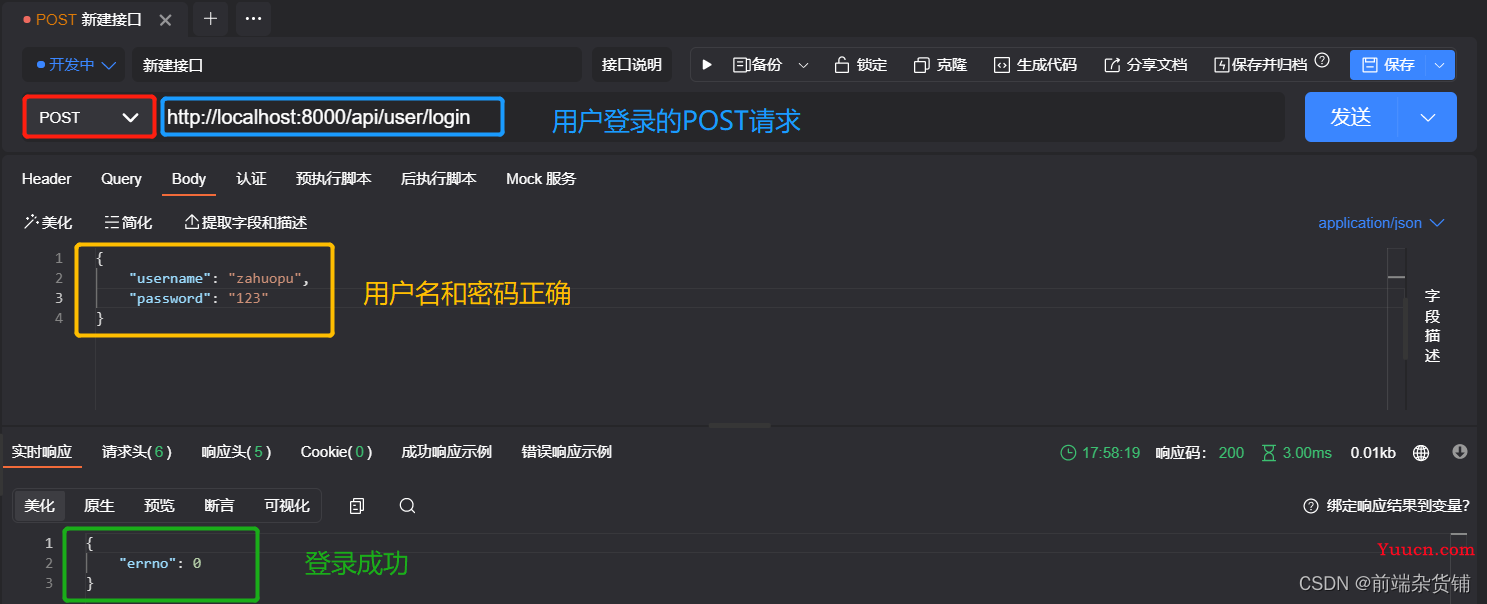
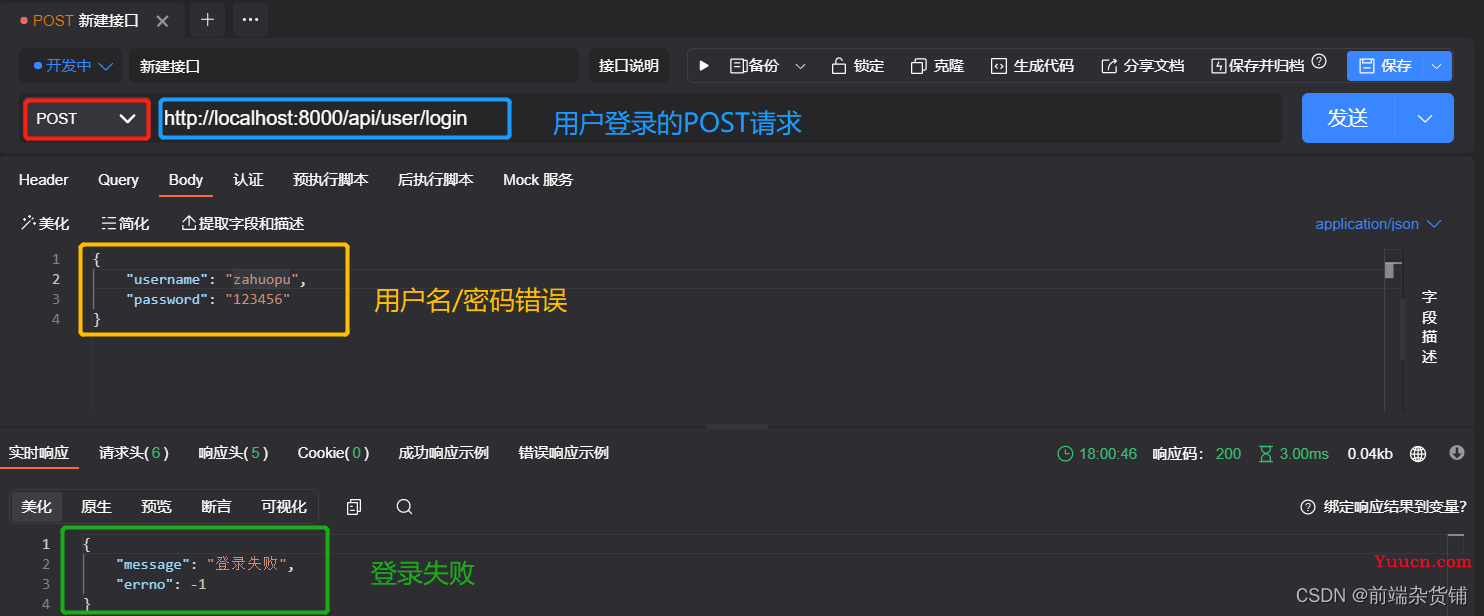
通过 ApiPost/Postman 工具测试 登录请求(POST 请求)
四、写在最后(附源码)
至此,开发博客的项目(假数据版,并没有使用数据库)就完成了。
后续会对该项目进行多次重构【多种框架(express,koa)和数据库(mysql,sequelize,mongodb)】
如果你需要该项目的 源码,请通过本篇文章最下面的方式 加入 进来~~
